Impact effect shader tutorial
This shader simulates an effect of a shockwave, something that is usually used with explosions.
In theory it’s a rather simple effect – we just need to use a texture that defines the distorted area and code our shader in a way that displaces pixels outwards from center. Let’s start by writing a shader that has everything that we need.
1

shader_type canvas_item;

uniform sampler2D noiseTexture;
uniform float offsetStrength : hint_range(0, 1);

void fragment()
{
	vec2 noiseOffset = texture(noiseTexture, UV).rg;
	noiseOffset *= offsetStrength;
	noiseOffset = smoothstep(0.0, 5.0, noiseOffset);

	vec2 screenUV = SCREEN_UV;
	screenUV += noiseOffset;

	vec4 color = texture(SCREEN_TEXTURE, screenUV);

	COLOR = color;
}
Just like with invisibility shader we use smoothstep to darken the noise and be able to set offsetStrength in more reasonable range (0 to 1 rather than small fractions).
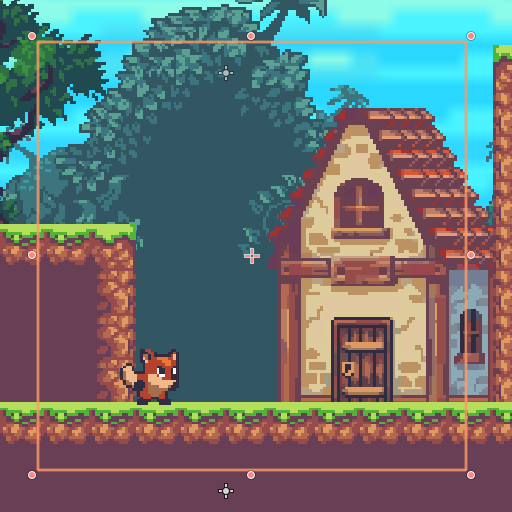
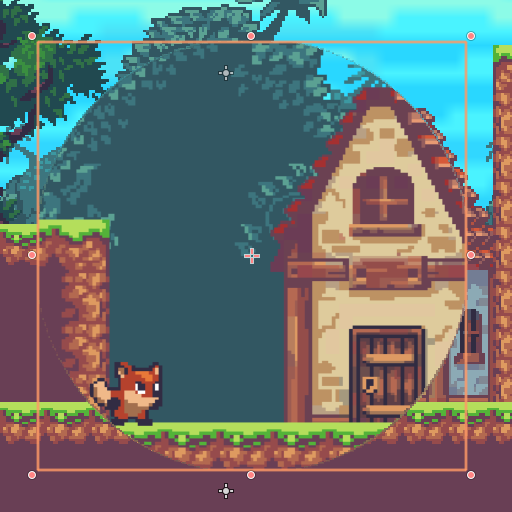
This shader will hide the object by making its color the same as the background. If we start increasing offsetStrength we will see that the image is shifting towards bottom left.
This is the origin of SCREEN_UV coordinates, subtracting the noiseOffset would move the image towards upper right. So what we need right now is to find a way to calculate the offset using our original image center as origin.
There are two way we could do that, we could either center object UV coordinates and use them. Or we could use vertex positions.
Let’s start with centered UVs.
1

shader_type canvas_item;

uniform sampler2D noiseTexture;
uniform float offsetStrength : hint_range(0, 1);

void fragment()
{
	vec2 noiseOffset = texture(noiseTexture, UV).rg;
	noiseOffset *= offsetStrength;
	noiseOffset = smoothstep(0.0, 5.0, noiseOffset);

	vec2 centeredUV = UV * 2. -1.;
	noiseOffset *= centeredUV;

	vec2 screenUV = SCREEN_UV;
	screenUV += noiseOffset;

	vec4 color = texture(SCREEN_TEXTURE, screenUV);

	COLOR = color;
}
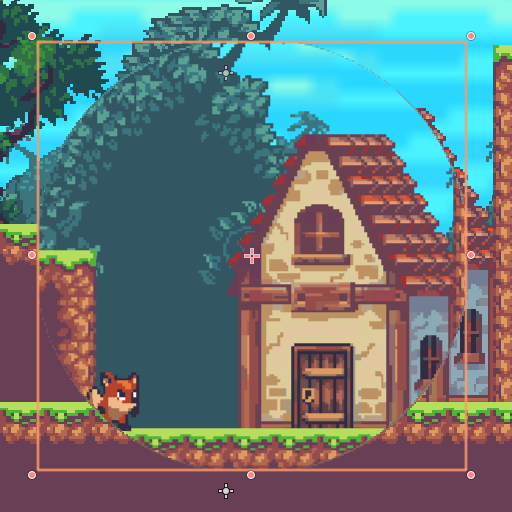
You can see that it sort of works, the image gets squished on X-axis and stretched on Y-axis. The reason for the is our centeredUV goes from -1 to 1, from left to right on X-axis and from top to bottom on Y-axis. In our previous example we added only positive number which moved the image to the bottom left, in this example left part of the circle is adding negative number, which moves that part of the image to the right.
The same applies to the Y-axis, but since our object UVs are going from top to bottom on Y-axis it stretches out instead of squishing. A simple fix is just to subtract values on the X-axis.
1

shader_type canvas_item;

uniform sampler2D noiseTexture;
uniform float offsetStrength : hint_range(0, 1);

void fragment()
{
	vec2 noiseOffset = texture(noiseTexture, UV).rg;
	noiseOffset *= offsetStrength;
	noiseOffset = smoothstep(0.0, 5.0, noiseOffset);

	vec2 centeredUV = UV * 2. -1.;
	noiseOffset *= centeredUV;

	vec2 screenUV = SCREEN_UV;
	screenUV += noiseOffset;
	screenUV.x -= noiseOffset.x;
	screenUV.y += noiseOffset.y;

	vec4 color = texture(SCREEN_TEXTURE, screenUV);

	COLOR = color;
}
Now let’s use vertex positions instead. Our sprite is a quad with 4 vertices in each of the corners, every vertex has a position, and it so happens that they are also calculated based on object’s center. So top left would be at (1, -1) and bottom right would be at (1, -1) when normalized. Make sure that the offset on your sprite is set to 0 (or if you’re using this tutorial as a guide for Unity shaders – set the pivot of your sprite to be at the center of the object).
1

shader_type canvas_item;

uniform sampler2D noiseTexture;
uniform float offsetStrength : hint_range(0, 1);

varying vec2 vertPos;

void vertex()
{
	vertPos = normalize(VERTEX);
}

void fragment()
{
	vec2 noiseOffset = texture(noiseTexture, UV).rg;
	noiseOffset *= offsetStrength;
	noiseOffset = smoothstep(0.0, 5.0, noiseOffset);
	vec2 centeredUV = UV * 2. -1.;
	noiseOffset *= centeredUV;
	noiseOffset *= vertPos;

	vec2 screenUV = SCREEN_UV;
	screenUV.x -= noiseOffset.x;
	screenUV.y += noiseOffset.y;

	vec4 color = texture(SCREEN_TEXTURE, screenUV);

	COLOR = color;
}
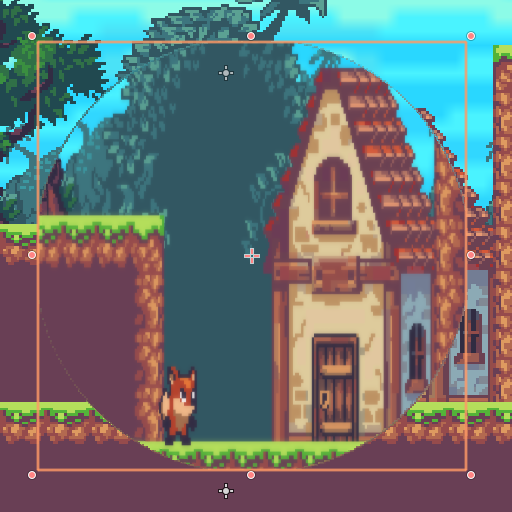
And that’s almost it. You might have noticed that there’s a small bit of color on the edge of our circle, it won’t be visible if you’re using a sprite where the white part of the gradient fades out on the edge, but if you want the hard egde on your effect – set the alpha to be that of your sprite.
1

shader_type canvas_item;

uniform sampler2D noiseTexture;
uniform float offsetStrength : hint_range(0, 1);

varying vec2 vertPos;

void vertex()
{
	vertPos = normalize(VERTEX);
}

void fragment()
{
	vec2 noiseOffset = texture(noiseTexture, UV).rg;
	noiseOffset *= offsetStrength;
	noiseOffset = smoothstep(0.0, 5.0, noiseOffset);
	noiseOffset *= vertPos;

	vec2 screenUV = SCREEN_UV;
	screenUV.x -= noiseOffset.x;
	screenUV.y += noiseOffset.y;

	vec4 color = texture(SCREEN_TEXTURE, screenUV);
	color.a = texture(TEXTURE, UV).a;

	COLOR = color;
}
